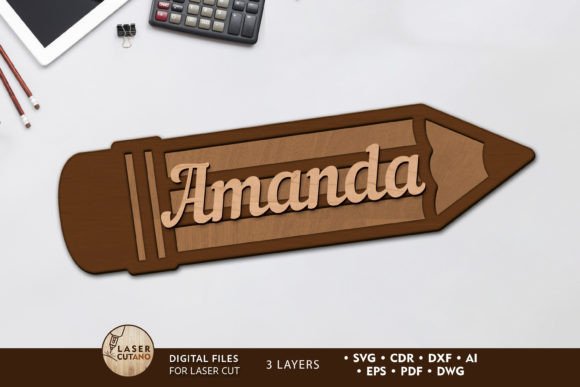
Decor Pencil Layered Laser Cut Template Guide
In the evolving landscape of digital fabrication, the line between graphic design and physical craftsmanship has blurred. For makers, educators, and small business owners, the Decor Pencil Layered Laser Cut Template represents more than just a file; it is a bridge between digital precision and tactile artistry. This specific design asset is engineered for those who understand that the impact of a project often lies in its dimensionality. Unlike flat vector illustrations, this multilayer layout invites you to build depth, creating a shadow-box effect that transforms simple materials into striking visual statements.
Whether you are running a Glowforge in your home studio, operating a CNC router for a school workshop, or managing a small-scale production line with an xTool machine, the versatility of this template offers a streamlined workflow. The core appeal here is convenience paired with professional-grade structure. You are not starting from scratch, guessing at tolerances, or worrying about bridge points. Instead, you are provided with a ready-to-cut solution that respects the limitations and strengths of laser cutting technology.
Understanding the Multilayer Aesthetic
The visual personality of the pencil design is inherently nostalgic yet modern. It taps into the universal symbol of creativity and learning, making it an ideal subject for educational decor, teacher appreciation gifts, or back-to-school marketing campaigns. However, the "layered" aspect is what elevates it from a cliché clip-art style to a sophisticated piece of modern typography and design. By separating the elements into distinct strata, the design allows light and shadow to play across the surface, adding a sense of luxury and effort that flat prints cannot achieve.
When working with the Decor Pencil Layered Laser Cut Template, you are engaging in a form of subtractive sculpture. Each layer contributes to the overall narrative of the object. The top layer might define the sharp edges of the pencil tip, while subsequent layers build the body, the eraser, and the metallic ferrule. This approach requires a keen eye for detail, which is why the provided files are so valuable. They have been pre-separated and optimized, saving you hours of manual vector editing.
The recommended material thickness of 3mm is standard for most hobbyist and semi-professional laser cutters. This thickness provides enough structural integrity for the layers to stand out without becoming too bulky or heavy. Materials like plywood and MDF offer a warm, organic feel that contrasts beautifully with the geometric precision of the cut. Alternatively, acrylic and plexiglas can be used for a sleek, contemporary look, particularly if you opt for contrasting colors between layers to highlight the depth.
Technical Precision and File Compatibility
One of the most frustrating aspects of digital fabrication is file incompatibility. You might have a beautiful design, but if it does not open in your specific software, it is useless. This product addresses that pain point by offering a comprehensive suite of file formats. Upon purchase, you receive a .zip folder containing .AI, .SVG, .DXF, .DWG, .CDR, .EPS, and .PDF files. This breadth of compatibility ensures that whether you are using Adobe Illustrator, CorelDRAW, AutoCAD, or free alternatives like Inkscape, you can access the design immediately.
It is crucial to remember to unzip the folder before attempting to use the files. This simple step is often overlooked by beginners, leading to confusion when software fails to read compressed archives. Once extracted, the files are ready for import. The .SVG and .DXF formats are particularly popular for users of Glowforge and xTool machines, as they handle vector paths cleanly and maintain scale integrity. For those using CNC routers, the .DWG and .DXF files provide the precise coordinate data needed for toolpath generation.
The design is sized at 3 x 6 inches for the finished product, but scalability is a key feature. You can increase the size of the design for larger wall art or signage without losing quality, as vector files are resolution-independent. However, caution is advised when reducing the size. Thin elements, such as the lines defining the wood grain or the text on the pencil, may become too fragile to cut or glue effectively if scaled down too far. Always test cut a small section if you plan to deviate significantly from the recommended dimensions.
Practical Applications for Creators and Educators
The utility of this laser cut file extends far beyond simple decoration. For educators, it serves as an excellent project for teaching spatial reasoning and engineering principles. Students can learn about tolerance, adhesion, and material properties by assembling the layers. For small business owners, these pencils can be transformed into unique packaging inserts, bookmark giveaways, or branded merchandise. Because the layers are glued, there is ample opportunity for customization through painting or staining before assembly.
Painting before gluing is a pro tip that significantly enhances the final result. Trying to paint the nooks and crannies of an assembled 3D object is difficult and often results in messy edges. By painting each individual layer while it is still flat, you ensure crisp, clean lines and full coverage. This technique allows for creative color blocking, such as making the eraser pink, the ferrule gold, and the pencil body yellow, or experimenting with non-traditional palettes for a modern art vibe.
In terms of brand identity, incorporating tangible, handcrafted elements into your marketing can set you apart. A laser-cut pencil sent as a thank-you note to a client demonstrates attention to detail and a commitment to quality. It transforms a digital transaction into a physical memory. Similarly, for interior designers, these layered pieces can be grouped to create dynamic wall installations in classrooms, libraries, or creative offices, adding texture and visual interest to otherwise flat surfaces.
Maximizing Quality and Durability
To get the most out of your Decor Pencil Layered Laser Cut Template, consider the adhesive you use. Wood glue works well for plywood and MDF, providing a strong bond that sands smoothly if needed. For acrylics, a solvent-based cement or specialized plastic glue is necessary to fuse the layers chemically. Clamping is essential during the drying process to ensure the layers align perfectly and do not shift. Misalignment at this stage can ruin the visual symmetry of the piece.
Furthermore, the choice of material affects the cutting speed and power settings on your machine. Plywood may require slower speeds to avoid charring, while acrylic needs a focused beam and consistent airflow to prevent melting. Always refer to your machine’s material library for baseline settings, but perform test cuts on scrap pieces of the same thickness. This practice saves material and ensures that the intricate details of the pencil design are cut cleanly without excessive burn marks or incomplete cuts.
Ultimately, this template is a tool for empowerment. It removes the technical barriers of creating complex multilayer designs, allowing you to focus on the creative aspects of finishing and presentation. Whether you are a seasoned maker or just starting your journey with laser cutting, the Decor Pencil Layered Laser Cut Template provides a reliable, high-quality foundation for projects that impress. By leveraging these pre-prepared design assets, you can produce professional-looking results efficiently, freeing up time to innovate and expand your creative portfolio.