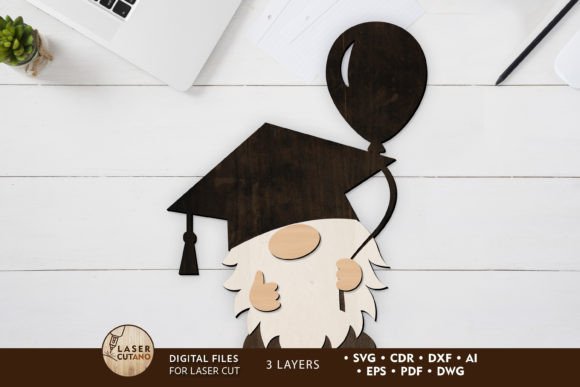
Gnome Layered Laser Cut Template: A Practical Guide for Precision Crafting
In the evolving landscape of digital fabrication, the intersection of design accessibility and machine precision has created new opportunities for creators. Whether you are a small business owner looking to expand your product line, an educator introducing students to manufacturing concepts, or a hobbyist refining your craft, having reliable assets is critical. The Gnome Layered Laser Cut Template represents more than just a decorative item; it is a structured digital asset designed to streamline the production process across various cutting technologies. By understanding how to integrate these files into your workflow, you can reduce preparation time, minimize material waste, and ensure consistent quality in your finished products.
Understanding the Digital Asset Structure
At its core, this product is a set of GNOME Digital multilayer layout files. These are not simple images but vector-based instructions specifically prepared for laser cutters, CNC router machines, and other computer-controlled cutting devices. The versatility of the file formats provided—.AI, .SVG, .DXF, .DWG, .CDR, .EPS, and .PDF—ensures compatibility with a wide range of software ecosystems. From industry-standard programs like Adobe Illustrator and CorelDRAW to accessible platforms used with Cricut machines, these formats allow for seamless integration into existing design pipelines.
The decision to offer such a broad spectrum of file types addresses a common pain point in digital crafting: compatibility friction. When you download the .zip file after payment, you gain immediate access to versions that suit your specific hardware and software preferences. This flexibility means you do not need to convert files manually, a process that often introduces errors or loss of precision. Instead, you can select the format that aligns with your current toolset, allowing you to move directly from acquisition to production.
Workflow Integration and Machine Compatibility
Integrating the Gnome Layered Laser Cut Template into your workflow begins with understanding your machine’s capabilities. The design is optimized for devices ranging from high-powered industrial laser cutters to desktop units like the popular Cricut. For users operating CNC routers, the .DXF and .DWG files provide the necessary geometric data for precise toolpath generation. Meanwhile, those using vinyl cutters or smaller laser diodes may find the .SVG or .PDF formats more straightforward to import and scale.
When using a Cricut machine, the process is particularly streamlined. The SVG format retains layer information, which is crucial for multi-step projects. You can upload the file directly to Design Space, where the layers are recognized individually. This allows you to assign different materials or colors to each layer if you are using a multi-tool setup, or simply to organize your cutting mat efficiently. The key here is organization; by keeping the layers distinct in your software, you maintain control over the assembly sequence before any physical cutting begins.
For laser cutter and CNC users, the focus shifts slightly to kerf compensation and power settings. Since the design involves multiple layers that must fit together snugly, understanding how your machine handles material thickness is vital. The template is designed with standard tolerances in mind, but always perform a test cut on scrap material. This step ensures that the tabs, slots, or overlapping areas align correctly, preventing gaps or overly tight fits that could compromise the structural integrity of the gnome.
Material Selection and Preparation Strategies
The success of any layered project depends heavily on material choice. The recommended materials for this template include Plywood, MDF, Acrylic, Plexiglas, Metal, Cardboard, and Paper. Each material offers different aesthetic and structural properties, influencing both the look of the final product and the technical approach required during cutting.
- Plywood and MDF: Ideal for rustic or sturdy decorations. These materials provide excellent contrast between layers, especially when stained or painted. Ensure the wood is free of warping to maintain flatness during gluing.
- Acrylic and Plexiglas: Perfect for modern, sleek designs. These materials require careful speed and power adjustments to avoid melting edges. Frosting or engraving effects can add depth to specific layers.
- Cardboard and Paper: Suitable for rapid prototyping or lightweight decor. These materials are cost-effective for testing the design logic before committing to expensive substrates.
The recommended material thickness ranges from 3 mm to 6 mm (approximately 1/8 inch to 1/4 inch). Staying within this range is crucial because the design’s interlocking features and layer heights are calibrated for these dimensions. Using material that is too thin may result in fragile components, while material that is too thick might prevent the layers from stacking correctly or obscure fine details. If you choose to increase the size of the design, ensure that the material thickness scales proportionally or that you adjust the design elements to accommodate the change. Conversely, when reducing the design, pay close attention to thin elements, as they may become too delicate to handle or cut accurately.
Assembly and Finishing Techniques
Once the cutting process is complete, the assembly phase begins. The Gnome design consists of three distinct layers, each contributing to the overall depth and character of the figure. The finished product measures approximately 4.34 x 7 inches, making it a compact yet impactful piece suitable for shelves, desks, or holiday displays.
A critical best practice in layered crafting is to paint before gluing. Attempting to paint assembled layers often results in uneven coverage, missed spots in crevices, and accidental glue contamination on painted surfaces. By painting each individual layer beforehand, you achieve a professional, uniform finish. Use acrylic paints for wood and MDF, or specialized markers and sprays for acrylics. Allow sufficient drying time to prevent smudging during assembly.
When gluing, use a adhesive appropriate for your chosen material. Wood glue works well for plywood and MDF, while cyanoacrylate (super glue) or epoxy may be better suited for acrylics and metals. Apply adhesive sparingly to avoid squeeze-out, which can mar the visible edges of the gnome. Align the layers carefully, using the cut edges as guides. Clamping or weighting the assembly while the glue sets ensures a strong bond and prevents shifting.
Quality Control and Long-Term Utility
Incorporating the Gnome Layered Laser Cut Template into your regular rotation of projects requires a mindset focused on consistency and quality control. Because this is a digital product, you can reproduce it indefinitely. This makes it an excellent candidate for batch production. If you are selling these gnomes, establish a standardized workflow: cut, sand (if necessary), paint, dry, assemble, and package. Documenting each step helps identify bottlenecks and maintains quality across multiple units.
Furthermore, consider the educational value of this template. For educators and workshop leaders, it serves as a tangible example of vector design, material science, and assembly logic. Students can learn how digital files translate into physical objects, understanding the importance of tolerance, layering, and finish work. The simplicity of the three-layer design makes it accessible for beginners while still offering enough complexity to teach valuable fabrication skills.
Finally, remember that the utility of this template extends beyond the immediate project. The techniques you refine while working with this gnome—such as managing multi-layer SVGs, optimizing cut paths, and mastering pre-assembly finishing—are transferable to more complex designs. By treating this template as a learning tool and a production asset, you maximize its value. Whether you are creating a single gift or a hundred units for a seasonal market, the Gnome Layered Laser Cut Template provides a reliable foundation for high-quality, efficient creation.
Thank you for exploring this guide. We hope these insights help you enjoy the process of bringing this adorable gnome to life, integrating it smoothly into your creative or commercial workflows.