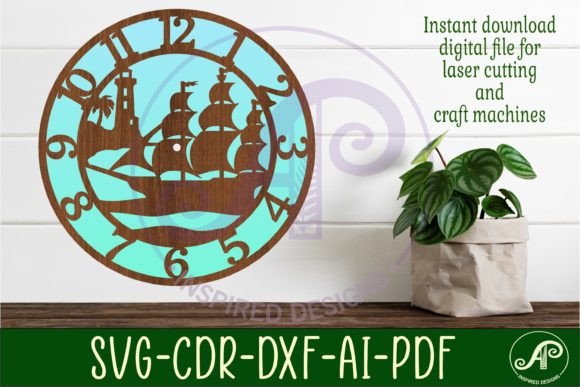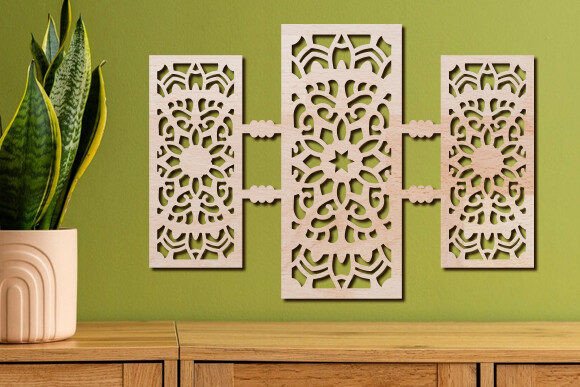
Laser Cut Mandala Wall Art Panels
Transforming a blank wall into a focal point of your home or business does not require expensive interior designers or complex construction work. With the rise of accessible digital fabrication tools, creating Laser Cut Wall Art Mandala Panels has become a popular and rewarding project for hobbyists, small business owners, and creative entrepreneurs alike. These intricate designs combine the spiritual symmetry of mandalas with the precision of modern laser cutting technology, resulting in stunning, multi-layered decor that adds depth, texture, and elegance to any space.
Whether you are looking to refresh your living room, add a unique touch to a yoga studio, or start a side hustle selling custom home decor, understanding how these panels work and how to produce them is the first step toward success. This guide explores the appeal of mandala wall art, the practical benefits of using digital files, and exactly how to bring these designs to life.
The Appeal of Multi-Layered Mandala Designs
Mandalas have long been symbols of harmony, unity, and mindfulness. In interior design, they serve as captivating visual anchors that draw the eye and create a sense of balance. When translated into Laser Cut Wall Art Mandala Panels, these circular patterns gain a new dimension. Unlike flat prints or paintings, laser-cut panels utilize layering to create shadow play and physical depth. This three-dimensional effect changes depending on the lighting in the room, making the artwork feel alive and dynamic throughout the day.
For beginners and experienced makers, the value lies in the versatility of the medium. You can cut these designs from various materials, including wood, acrylic, MDF, or even metal, depending on your machine’s capabilities. Wood offers a warm, organic feel perfect for bohemian or rustic interiors, while acrylic provides a sleek, modern look suitable for contemporary offices or galleries. The ability to customize colors, finishes, and sizes means that every piece can be tailored to specific client needs or personal tastes.
Ideal Uses for Laser Cut Wall Decor
The applications for Laser Cut Wall art Mandala Panels Wall Decor extend far beyond simple home decoration. Understanding where these pieces fit best can help you maximize their impact or market potential.
- Residential Spaces: Large mandala panels make excellent headboards in bedrooms or statement pieces in living rooms. Smaller versions can be grouped together to create a gallery wall effect.
- Wellness and Yoga Studios: Given the meditative nature of mandalas, these artworks are perfectly suited for spaces dedicated to relaxation, mindfulness, and exercise. They contribute to a calming atmosphere that enhances the user experience.
- Commercial Interiors: Restaurants, cafes, and boutique hotels often use textured wall art to define zones or add character to otherwise plain walls. A well-lit mandala panel can serve as an Instagram-worthy backdrop that encourages social sharing.
- Gifts and Events: Customized laser-cut art makes for memorable wedding gifts, housewarming presents, or corporate awards. The personal touch of a handmade or locally fabricated item adds significant emotional value.
What You Get in the Digital Package
One of the greatest advantages of purchasing digital designs for laser cutting is the immediate accessibility and flexibility they offer. When you acquire a design for Laser Cut Wall Art Mandala Panels, you are typically provided with a comprehensive ZIP file containing multiple file formats. This ensures compatibility with a wide range of software and machinery.
Inside the archive, you will usually find:
- Vector Files (AI, EPS, SVG, DWG, DXF): These are the most critical formats for laser cutting. Vector files allow your machine to read the paths precisely, ensuring clean cuts without pixelation. AI and EPS are standard for Adobe Illustrator users, while SVG is widely supported by browser-based and entry-level cutting software. DWG and DXF are essential for users working with AutoCAD or other engineering-focused platforms.
- Raster Files (PNG, JPG): These image files are useful for previewing the design, creating marketing materials, or using as reference guides during assembly. They are not used for the actual cutting process but are vital for visualization.
Having access to all these formats means you are not locked into a single software ecosystem. Whether you use LightBurn, RDWorks, LaserGRBL, or proprietary software from manufacturers like Glowforge or xTool, there is a file type ready for your workflow.
Step-by-Step Guide to Creating Your Art
Creating your own Mandala Wall Decor Laser Cut design is a straightforward process if you follow the correct sequence. Here is how to transform digital files into a physical masterpiece:
- Download and Extract: Begin by downloading the ZIP file to your computer. Use your operating system’s built-in extraction tool or software like WinZip to unpack the contents. Ensure all files are accessible and organized in a dedicated folder.
- Prepare the Software: Open your preferred laser cutting software. Import the appropriate vector file (such as SVG or DXF) into the workspace. Check the scale to ensure it matches your desired final dimensions. Assign cut settings based on your material thickness and type—this may require test cuts to perfect power and speed settings.
- Cut Each Layer: Load your material onto the laser bed. Secure it properly to prevent shifting. Send the job to the machine and monitor the first few seconds to ensure everything is aligned. Repeat this process for each layer if your design involves multiple pieces that stack together.
- Assembly and Stacking: Once all layers are cut, clean off any char marks or debris. Lay out the pieces according to the serial order provided in the design instructions. Stack them carefully, using spacers or adhesive if required, to create the final 3D effect. This step is crucial for achieving the intended depth and visual impact.
With these simple steps, you can create your own stunning Mandala Wall Decor Laser Cut design. The process is repeatable, allowing you to refine your technique and experiment with different materials over time.
Important Considerations for Best Results
While the process is user-friendly, there are a few factors to keep in mind to ensure professional-quality results. First, material selection plays a huge role in the final appearance. High-quality plywood with minimal knots will yield cleaner edges than lower-grade woods. If using acrylic, ensure it is cast acrylic rather than extruded, as it tends to cut clearer with less melting.
Second, patience during assembly is key. Rushing the stacking process can lead to misaligned layers, which disrupts the symmetry of the mandala. Take your time to align each piece perfectly. Finally, consider the finishing touches. Sanding rough edges, applying wood stain, or painting specific layers can elevate the design from a simple craft project to a high-end decor item.
We are happy to answer any questions you may have about file compatibility, material recommendations, or troubleshooting cut settings. Thank you for visiting my store, and we look forward to seeing the beautiful creations you bring to life with these designs.